![]()
When people ask me about Facebook Ads, I always give my same standard list of action items, which has nothing to do with Facebook Ads. The goal is to run a successful ad campaign. In order to do that, there’s preparation that needs to take place before you can run an ad, and it’s going to involve personas, marketing or sales funnels and a Facebook Pixel.
And there’s always an influx of questions that come in after that. So here I explain it all in some detail.
Download the Facebook Pixel Installation Instructions Here
The Three Steps You Need to Take to Run a Successful Facebook Ad
- Create a persona. This is your target market. Make a one-pager with exactly who it is you’re looking for. You might have one, or you could have four. Nevertheless, you need to get clear about who this persona is so you have someone to target.
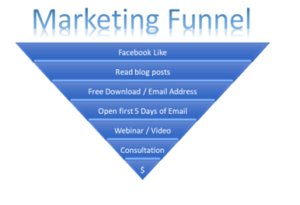
- Create your marketing/sales funnel. Become clear about how you’re going to get all those hundreds or thousands of people who match your persona, down your pipeline until you get the sale. You’re going to lose some along the way, and that’s fine. Not everyone is your customer. The funnel could look something like this:
3. Install your Facebook Pixel.
And this is when it all comes to a screaching halt and the frenzy of questions start.
Here’s a brief explanation of what the FAcebook Pixel is and how to install it.
What is a Facebook Pixel?
A code provided to you by Facebook, that gets installed on your website. It tracks visitors to pages on website.
Why do I Need a Facebook Pixel?
Reach the right people- Find new customers, or people who have visited a specific page or taken a desired action on your website.
Drive more sales- Setup audiences in your Facebook Ads Manager to target people who have visited your website, and other people just like them out of the millions of people on Facebook. You can even get as specific as a targeting people who visited a certain page.
Measure results of your ads- Understand how successful your ad is by seeing what happened as a direct result of your ad. You can view information like conversions and sales.
You can retarget- You set up ads to target people who visited your website but didn’t purchase. Or people who viewed your free video or webinar, but didn’t sign up for your course.
#1 reason I recommend every one of my clients to install a Facebook Pixel- IT INCREASES ORGANIC REACH ON FACEBOOK!! Tracks website visitors. Facebook then acknowledges that people visit your website, and therefore, will push your posts to more feeds.
Great, right? So now, how do you get that pixel on your website? I’ve got the answer for you.
How to Install your Facebook Pixel
You get your Facebook Pixel from your Ads Manager.
On your business profile page, click on the white arrow on the upper right hand side. On the drop-down menu, click on Manage Ads.
Click on the 3 white lines on the upper left hand corner. On the drop down menu, click on Pixels.
![]()
Click on Create a Pixel
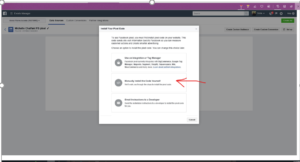
![]() Pick the best option for your business.
Pick the best option for your business.
![]()
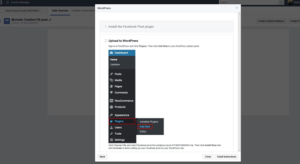
Check the “Use an Integration or Tag Manager” option, to see if the integration you want to associate with your Facebook account is listed.
Current integrations are: WordPress, Google Tag Manager, WooCommerce, Wix, Shopify, Magento, Big Commerce, Segment, Squarespace, and they’re always adding more.
Let’s Use WordPress as an example.
When you click on the WordPress in the installation process, it will guide you to download a plugin called for the Facebook Pixel. Once it’s saved on your computer, go to your Wordpess.
Go to Plugins, Add New. You will be guided to add the new plugin that is saved on your computer.
Once installed, go back and copy your Facebook Pixel ID.
![]()
Open up the plugin in WordPress, and paste the Facebook Pixel ID where indicated and save.
![]()
If your integration is not a partner with Facebook Pixel, you will need to add the code manually.
When you click on the Facebook Pixel Code box, it will automatically copy the code onto your clipboard.
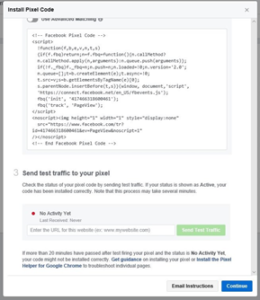
You will then need to install it in the header of your website. Find the <head><head>tags in your webpage code, or locate the header template in your CMS or web platform.
Paste the pixel code at the bottom of the header section, just above the </head> tag. Facebook pixel code can be added above or below existing tracking tags (such as Google Analytics) in our site header.
Once installed you can test if it’s active. In Step 3 in the image above, you can enter your URL to send a test traffic to your pixel. The red dot just above Last Received will turn green and it will state the date and time it last received a visitor.
There’s plenty of help on Facebook on how to install properly, and if all else fails, do what I do….call your service provider. They should be able to walk you through it step by step.
Download the Facebook Pixel Installation Instructions Here and forward this blog to anyone you feel might be able to use this information.
Have you ued the Facebook Pixel in your Facebook Ads?